Recently, we dove into a Salesforce + QuickBooks integration project — and it’s been a rewarding one!
Our client needed a seamless connection between Salesforce’s Account object and QuickBooks’ Customer object. These two are the heart of customer data in their respective systems. Syncing them ensures data consistency, reduces manual input, and empowers both the sales and finance teams with a unified customer view.
Here’s how we made it happen 👇
🔐 Step 1: Get Your QuickBooks Credentials
First things first — get the keys to the financial kingdom (a.k.a. API credentials):
- Log in at Intuit Developer
- Head to My Hub → App Dashboard
- Click “Create new app” or “+”
- Choose a name and select accounting scope (you can add payment scope later if you need to.)
- Go to your app
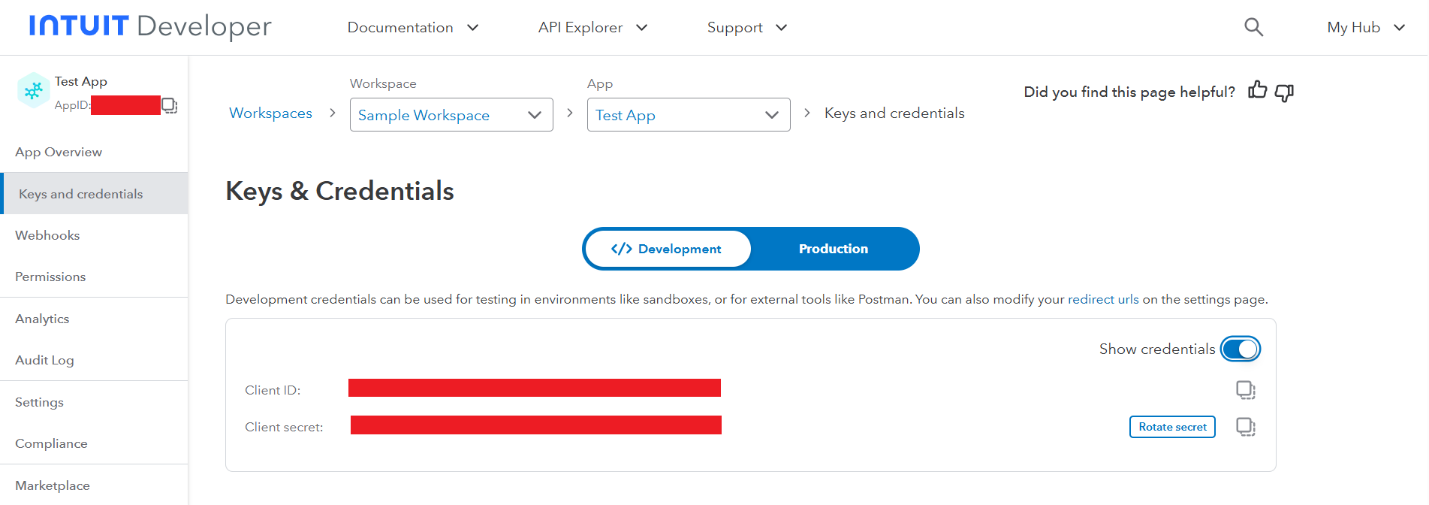
- Open tab Keys and Credentials → Development
- Click “Show credentials” and grab your Client ID and Client Secret
Now that you have the necessary information, it’s time to cook up some authentication in Salesforce.
🔧 Step 2: Set Up Salesforce Authentication for QuickBooks
Time to make Salesforce and QuickBooks shake hands (and promise to be best friends forever):
- Go to Auth. Providers in Salesforce Setup → click New
- Select OpenID Connect as a provider type
- Enter any name and URL suffix
- Fill in the Consumer Key with Client ID from QuickBooks and Consumer secret with Client Secret from QuickBooks
- Use the following URLs:
-
- Authorize Endpoint: https://appcenter.intuit.com/connect/oauth2
- Token Endpoint: ‘https://oauth.platform.intuit.com/oauth2/v1/tokens/bearer’.
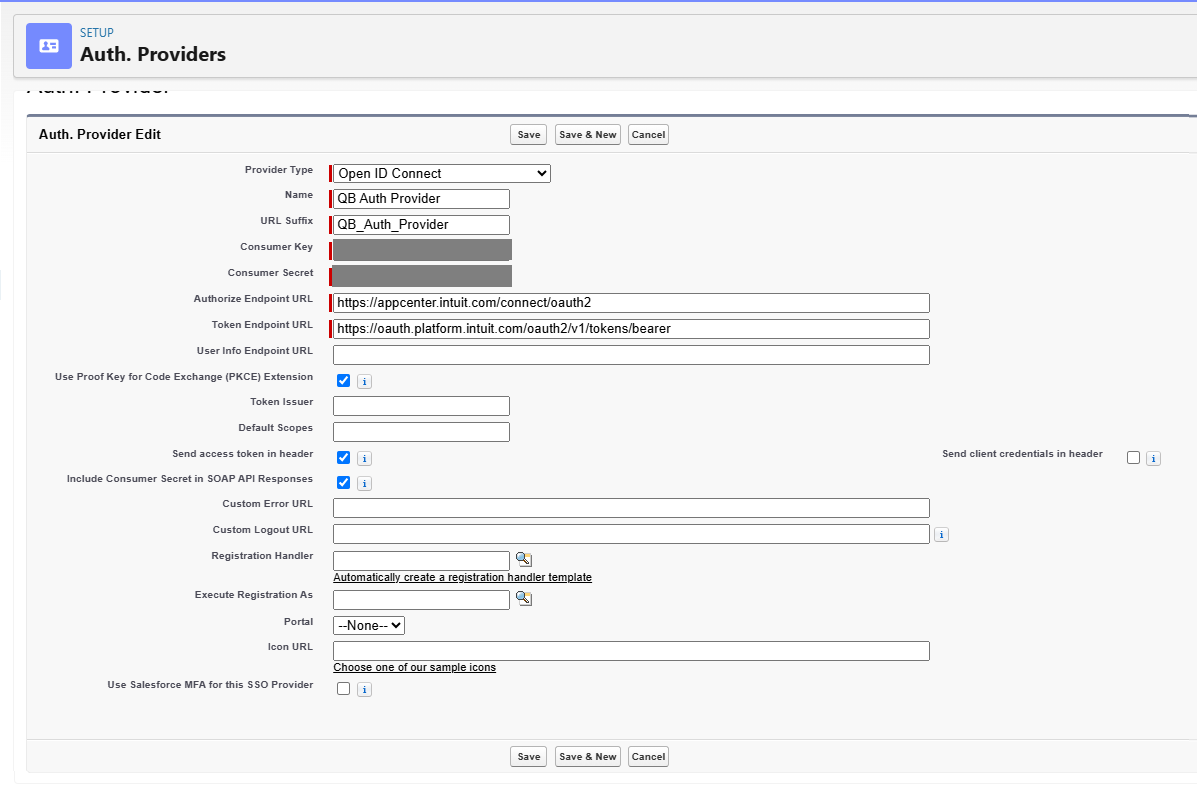
- Save and copy the Callback URL for your auth provider at the bottom of the page

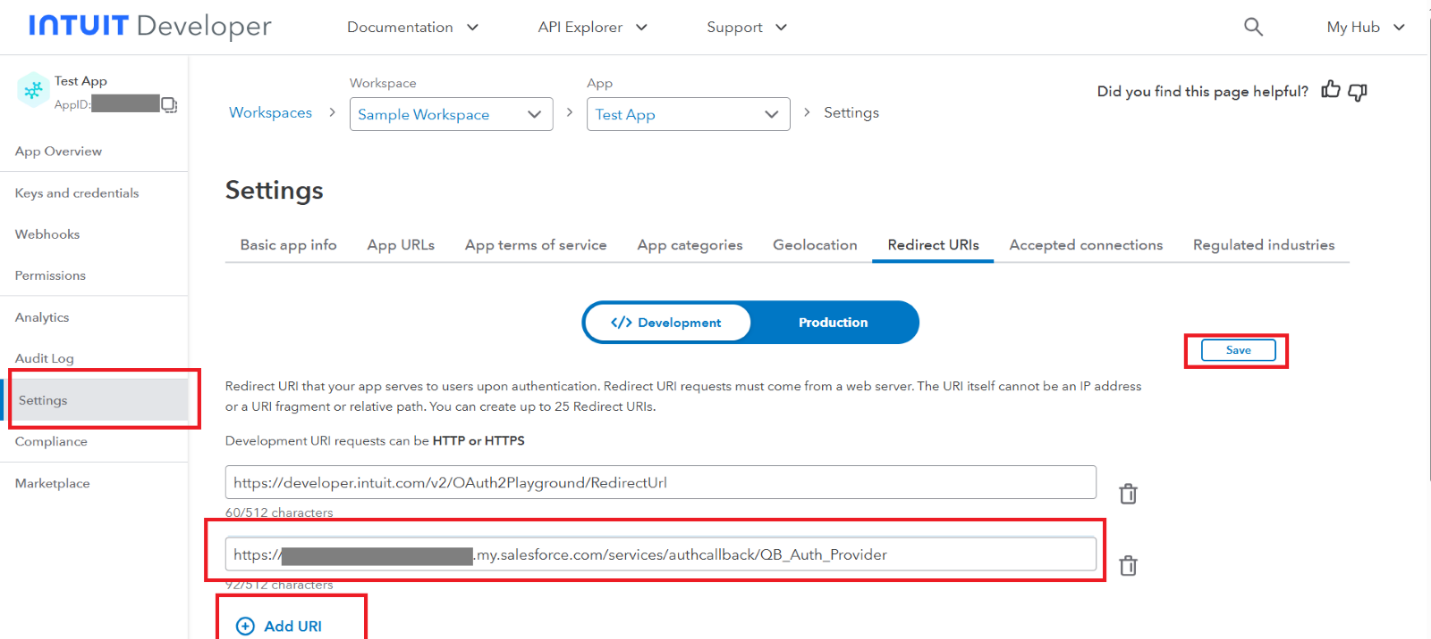
- Open your QuickBooks developer app that you’ve created in the first step and go to Settings → Redirect URIs tab. Make sure you are on the Development settings. Click ‘Add URI’ and enter your Callback URL from Salesforce.
🎉 Boom. Auth connected. (You may now high-five your keyboard.)
Step 3: Create Legacy Named Credentials in Salesforce
Named Credentials are like your Salesforce butler — they handle all the API business behind the scenes.
- In the Quick Find Box enter Named Credentials, select them.
- Click on the dropdown next to the ‘New’ button and select 'New Legacy’.
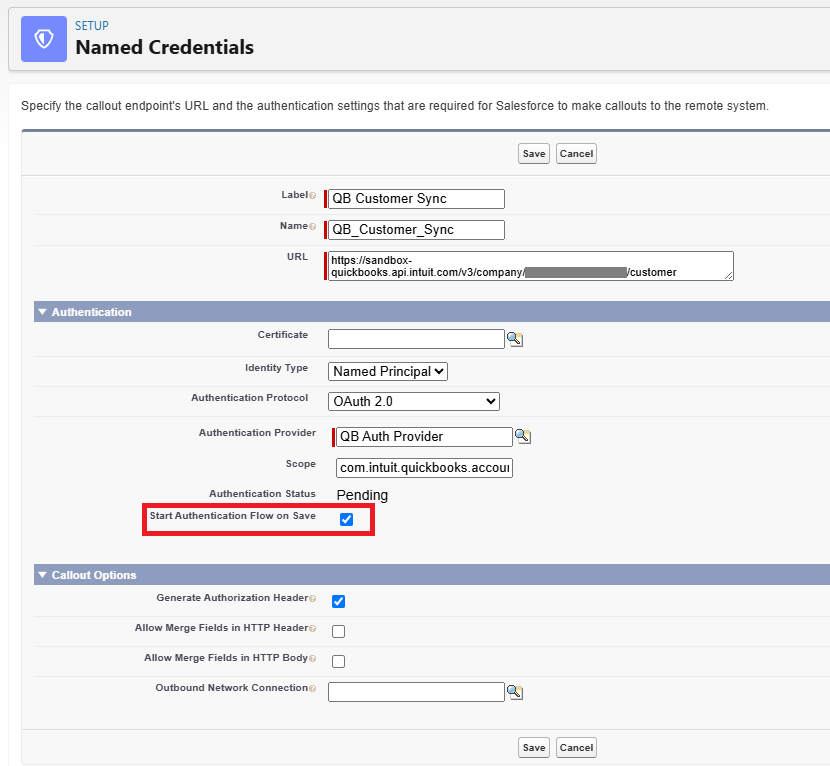
- Enter the name and the label for the credential.
- For the URL you can enter either the exact endpoint for the specific integration or generic endpoint for the QuickBooks system. We recommend the first approach. Use this URL: https://sandbox-quickbooks.api.intuit.com/v3/company/{realmId}/customer
for Account-Customer integration. (The {realmId} in the URL is Company Id for your QuickBooks environment. You can get it by going to your QuickBooks Developer account and select ‘Sandboxes’. Then you will see the list of your sandboxes and an option to copy the Company Id of any sandbox you have.) - Leave Certificate field empty.
- Identity Type: Named Principal
- Authentication Protocol: OAuth 2.0
- Select previously created Auth. Provider for Authentication Provider field
- Scope: com.intuit.quickbooks.accounting
- Set “Start Authentication Flow on Save” to true, leave all other options → Save
- A prompt will appear. Log in with your QuickBooks account credentials. Make sure your Named credentials have Authentication Status ‘Authenticated’. Repeat step 3 for every integration endpoint you need.
🔄 Step 4: Set Up Account → Customer Integration
Here’s where the fun (read: automation) begins:
-
Create or edit your Account Trigger Handler. You’ll want to add methods that check whether integration is needed and send requests to the QuickBooks system. (Pro tip: create a set of fields that will trigger the integration specifically on update events — this helps cut down the number of unnecessary requests.
-
Create or update your Account Trigger to call Account Trigger Handler methods on after insert and after update events. That way, whenever an Account is created or updated, your integration logic kicks in automatically. Sit back and let the magic happen.
-
Now, it’s time to parse Account fields into the Customer body structure required by QuickBooks. For this, check out the QuickBooks API documentation — it's your best friend here. You’ll find all the details about fields accessible via API and how different QuickBooks objects are configured:
👉 QuickBooks API Docs
-
Once you’ve got your data ready, create HTTP request and set up the endpoint, body, and headers like this:
HttpRequest request = new HttpRequest();
request.setEndpoint('callout:' + endpoint);
request.setHeader('Content-Type', 'application/json');
request.setHeader('Accept', 'application/json');
request.setMethod('POST');
request.setBody(body);
request.setTimeout(10000);
Here:
-
The endpoint variable should contain the name of the Named Credential (yes, the "Name" field exactly).
-
The body variable should be the JSON string of the object you want to send to QuickBooks.
-
Send the request and parse the response. You'll receive a JSON that includes a property named after the QuickBooks object — in this case, "Customer". Inside that is the actual Customer object you just created, including all its fields.
-
And don’t forget this crucial step: Save the Id field from the response into an External Id field on the Account object in Salesforce. (Hint: you’ll need to create a custom field for this. Trust us, Future You will be grateful.)
📅 Step 5: Customer → Account Integration (Webhook Style!)
- Create Salesforce endpoint for Webhook: Start by creating an Apex class as a REST resource.
Add this annotation at the top of your global Apex class:
@RestResource(urlMapping='/{yourUrl}') - Make sure your class is declared using the without sharing keyword.
- Inside the class, define a global static void method with the @HttpPost annotation to handle incoming POST requests like a boss.
- Create a Debug statement to log this statement:
RestContext.request?.requestBody?.toString() . Save your class (and deploy if needed). For now, you can leave it be — it’ll be waiting for action like a true backend ninja.
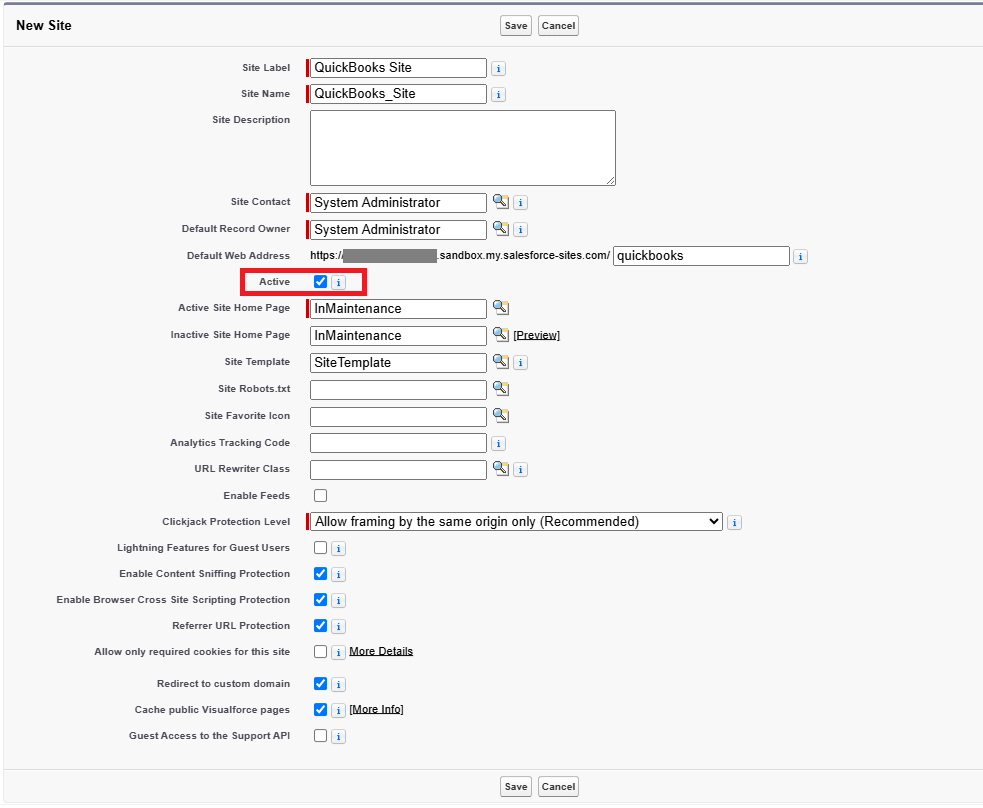
- Head over to Salesforce Setup, type “Sites” in the Quick Find box, and click it. Then click “New” and fill in all required fields with something meaningful (something you’ll recognize later — “MyWebhookSite” is more helpful than “Test123”).
- Don’t forget to check the “Active” checkbox, and select any page for the Active Site Home Page field. Click Save.
- Still in Sites, click on your newly created site name.
On the site details page, click “Public Access Settings” — this takes you to the Profile configuration page. There, find “Apex Class Access” and add the class you created in Step 1. Click Save — access granted!

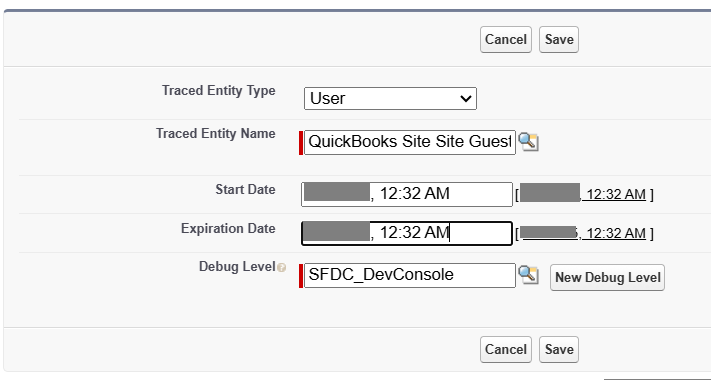
- Still in Setup, navigate to Debug Logs.
Click “New”, and for the “Traced Entity Type”, choose User. - Then for the Traced Entity Name, search for and select your [YourSiteName] Guest User (you might need to do a quick search).
- Set Start and Expiration Dates to cover at least an hour — better safe than sorry.
For Debug Level, select “SFDC_DevConsole”, and hit Save.
You’re now ready to track the webhook’s every move.
- Assemble your webhook endpoint. Time to put it all together like a glorious Salesforce sandwich.
Here’s the general template: https://[domain].sandbox.my.salesforce-sites.com/[siteURL]/services/apexrest/[classURL]. - Breakdown:
- [domain]: Your org’s Salesforce domain.
- [siteURL]: The unique URL part of your Site.
- [classURL] is your class’s @urlMapping attribute value.
- Find this in Setup → Sites → [your site] → Site Details → Custom URLs section.
- The “Path” column is the value you want, the value of this column will be your ‘siteURL’.
And voilà — you’ve got yourself a publicly accessible webhook endpoint that’s ready to receive Customer data and start working that Salesforce magic.
🔔 Step 6: Configure QuickBooks Webhook
- Navigate to your QuickBooks Developer account and go to: App Dashboard → Your_App_Name → Webhooks
Make sure you're in the “Development” environment — not Production (unless you're feeling brave, but let’s test first). - In the Endpoint URL field, enter the webhook URL you assembled in the previous instructions (this one https://[domain].sandbox.my.salesforce-sites.com/[siteURL]/services/apexrest/[classURL]).
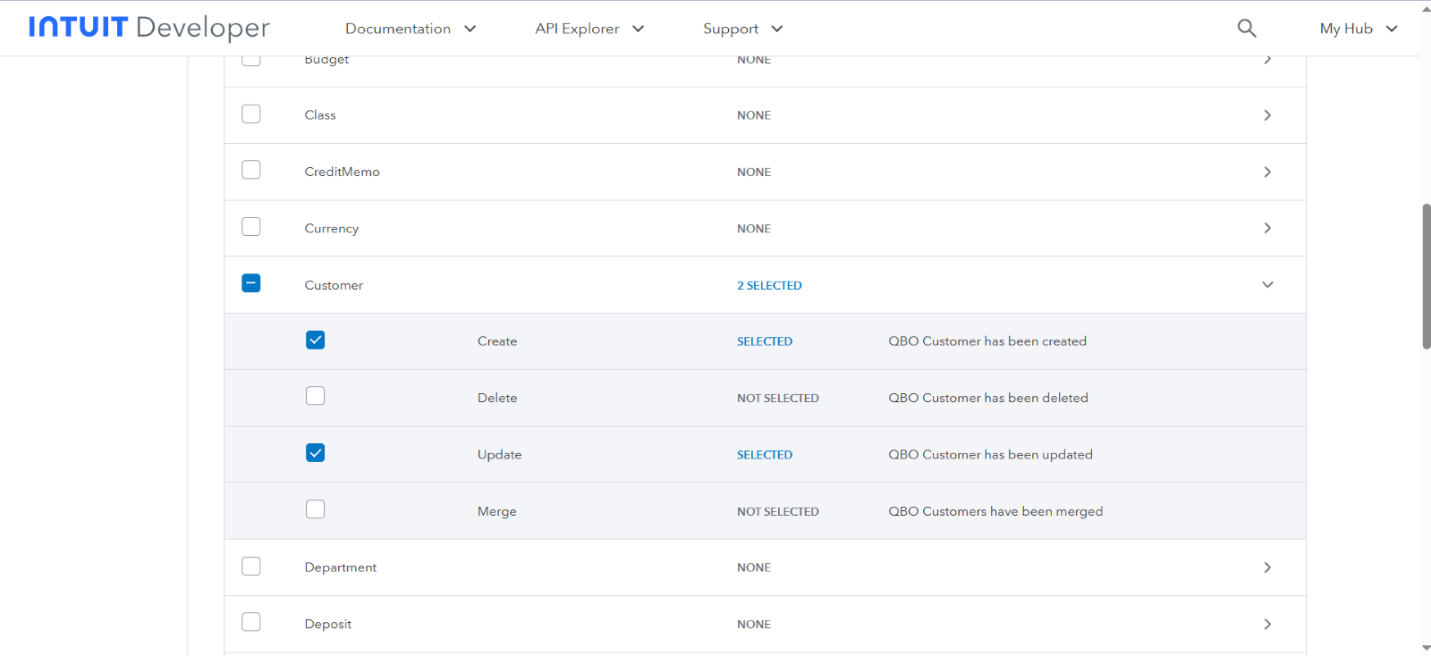
- Scroll down to the Subscribed events Section. Here’s where you choose what changes in QuickBooks should trigger your webhook.
- For this setup, we only need:
- Customer → Create
- Customer → Update
- Make sure to deselect everything else — no need to overwhelm your endpoint with extra noise
- Scroll back up and click the “Save” button. Congrats — the connection is configured!
- Let’s make sure everything’s working before we throw a party. In the Webhook page, go to the “Actions” dropdown (top of the Subscribed Events section).
- Select “Send test events”.
- In the “Select Event” dropdown, choose “Customer Update”.
- You’ll see a sample event body. Click “Send”.
- Now go back to Salesforce Setup → Debug Logs.
Look for a log entry for your Site Guest User (the one you set up earlier). - Open the log and find the Debug statement logging the request body.
Make sure the structure matches the sample you saw in QuickBooks — that means the webhook is working as expected.
Boom! Your QuickBooks webhook is now live and ready to push Customer updates straight into Salesforce.
🔍 Step 7: Handle Incoming Events
Before diving into the action, hold up — let’s make sure we’re reacting to the right event (you don’t want to process a “delete” when you’re expecting an “update,” right?).
-
Parse the request body and double-check the following properties:
'operation' — should match your expected action (create or update)
'name' — should be the object type you're targeting (like "Customer"). Only proceed once you've confirmed both are correct. Now it's time to fetch the record that triggered the event.
-
You have two options here — fetch a single record directly or pull multiple records at once.
👉 Option 1: Retrieve a Single Record
If you're working with a single ID, use this snippet:
HttpRequest request = new HttpRequest();
request.setEndpoint('callout:' + customerNamedCredentialName + ‘/’ + idFromTheEvent);
request.setHeader('Content-Type', 'application/json');
request.setHeader('Accept', 'application/json');
request.setMethod('GET');
request.setTimeout(10000);
This makes a clean GET call to QuickBooks using your named credential, appending the record ID directly.
👉 Option 2: Retrieve Multiple Records
If you’ve got a batch of IDs (lucky you), here's how to handle it:
- First, set up a new Named Credential pointing to: ‘https://sandbox-quickbooks.api.intuit.com/v3/company/{realmId}/query’ endpoint (look up ‘Set up Salesforce authentication for QuickBooks’ step 4) and use the following code snippet:
HttpRequest request = new HttpRequest();
request.setEndpoint('callout:' + queryNamedCredentialName);
request.setHeader('Content-Type', 'application/text');
request.setHeader('Accept', 'application/json');
request.setMethod('POST');
request.setBody(‘select {fieldsYouNeed} from Customer where id in ({coma separated and enclosed in single quotes list of received Ids})’);
request.setTimeout(10000);
Once you've pulled the data, you can proceed with processing it in Salesforce — and yes, this is where things get exciting.
🔒 Step 8: Secure the Webhook
Let’s talk about something serious — security.
When you expose any endpoint publicly (like we’re doing with the webhook), you're essentially putting up a digital "Open" sign on your Salesforce door. And while that’s necessary, it also means you need a bouncer at that door.
QuickBooks helps by sending a unique signature in every webhook request, tucked neatly into the intuit-signature header. This signature is your proof that the request is legit — think of it as QuickBooks’ secret handshake.
The signature is a hash (HMAC SHA256) of the request body, using your Webhook Verifier Token as the key. If the math checks out, you can safely process the request. If not — time to shut it down!
1. Find your Verifier Token
Go to your QuickBooks Webhook settings and toggle "Show Verifier Token". Copy that token like it’s the last slice of pizza — securely! 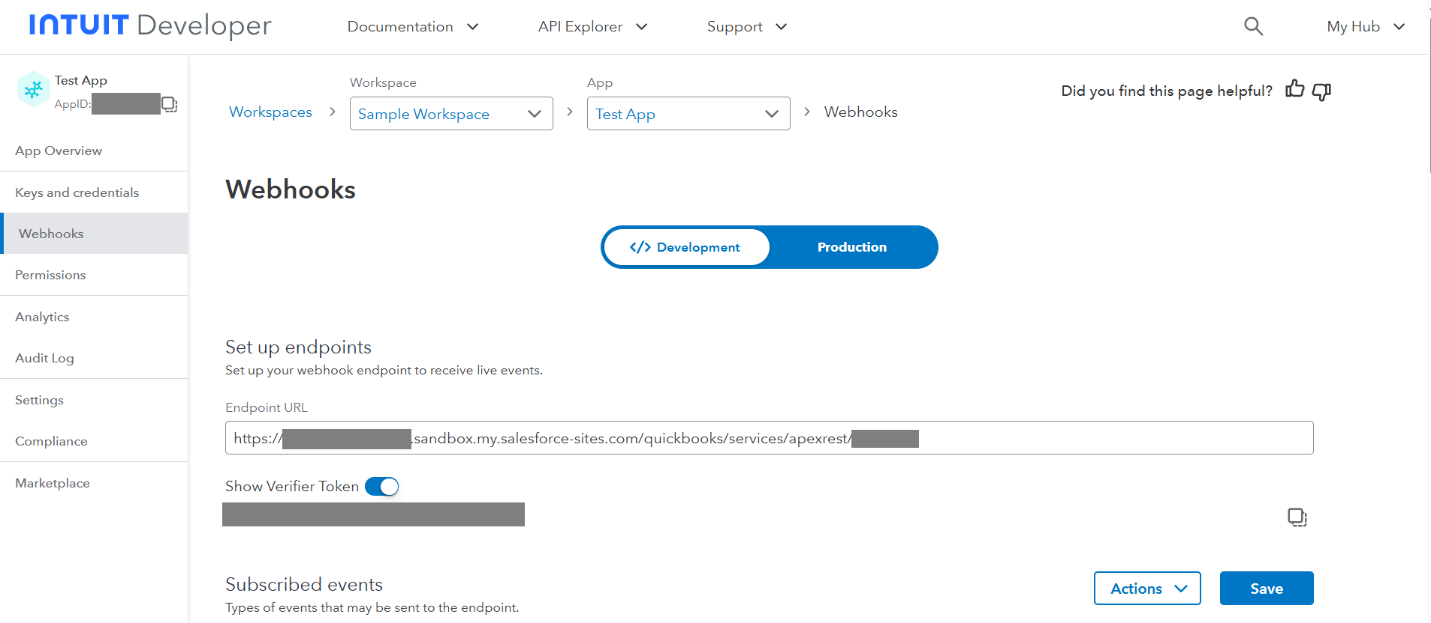
2. Store it safely
Drop it into Custom Settings, Custom Metadata, or another secure storage method in your org.
3. Verify the Signature in Apex
Use this code snippet to validate the request:
Crypto.verifyHMac(
'hmacSHA256',
RestContext.request.requestBody,
Blob.valueOf(VERIFIER_TOKEN_STRING),
EncodingUtil.base64Decode(RestContext.request.headers.get('intuit-signature'))
);
This method returns a Boolean — if it's true, the request is verified and safe to handle. If it's false, back away slowly (and log it for further investigation).
✅ Important Tip
Always perform this verification before doing anything else with the request. Think of it as checking someone's ID at the door before letting them into the party.
🚀 Step 9: Move to Production
You've done all the heavy lifting in sandbox — nice work! Now it’s time to bring that magic into production. ✨
Luckily, you don’t have to reinvent the wheel. Just repeat everything you did for the sandbox setup, but this time use your production credentials and make sure you’re working under the Production tab in QuickBooks.
There’s one sneaky little difference: where to find the Production Company ID. Here’s how to get it:
-
Log in to your QuickBooks Online production account.
-
Press Ctrl + Alt + / (or Control + Option + ? if you’re on a Mac — QuickBooks plays nice with both).
-
A window will pop up like a secret developer cheat sheet.
-
Copy the Company ID shown there.
That’s the golden key to connecting your production environment to QuickBooks.
Now you're officially set for launch. Don’t forget to double-check credentials, endpoints, and webhook settings before going live — and maybe do a small happy dance.